"Stay awhile and listen!"
So, let me tell you my story and adventure that "burned" my weekend and consumed over 40h. I had (forced to accept, due to emotional blackmail) the "pleasure" of working on an encrypted Android Phone. The phone was/is an Oukitel K10000 Pro a chinese phone, pretty good quality, sporting a 10000mha battery and a MTK6750 CPU. The same phone that I rescued before by changing the broken screen, straightening the frame and gluing the broken plastic frame, painting it black...etc.
Back to the story, the phone was stuck in a bootloop, wasn't booting to fastboot or recovery. So I was forced to backup the data even if it was encrypted hoping I can decrypt it or mount it somehow.
Step 1 - Backing up the data
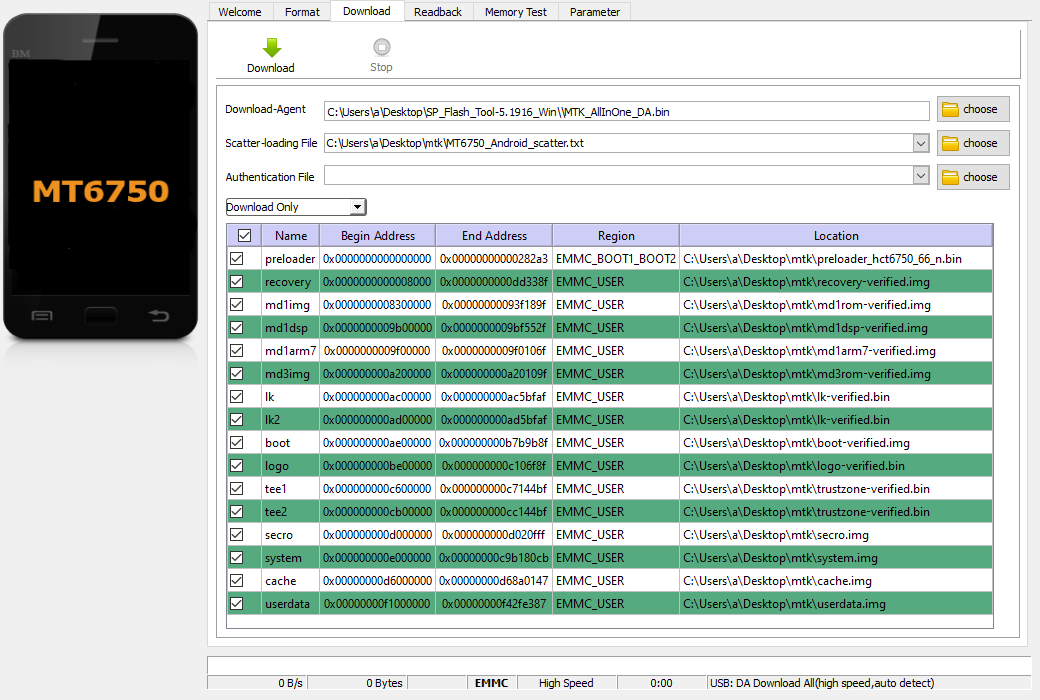
I learned the hard way that backing up the data on a MTK phone is quite ugly.To backup the phone you will need the MTK Preloader driver, and the MTK SP Flash Tool. Luckily in my case, the phone enters MTK Preloader mode when powered off and connected to the PC via USB. If your phone does not enter Preloader mode this way then you will need to remove the battery and then connect it to the PC.
Next, you will need a rom split in images. Just download the OEM one as close as you can get to the version you have/had on your phone. Each rom will contain a scatter file. The scatter file describes the partition table. Looking over older roms I realized that the start of the partitions are the same. But going back to the matter at hand.
"Backing up the data" is done via the "Readback" tab. When you connect a phone to the SP tool and access it in any way (I recommend Memory test) the app will populate the EMMC Flash section. in the UA Size you will see the total size of your EMMC. In the Read Back section add a new entry for EMMC_USER starting 0x0 ending at the UA Size. If you have any problems try subtracting 1 byte or a few from the end address.
Great now we have the full backup. In one huge in my case 32GB file.
Step 2 - Check the Phone and make it work
We will need a working phone to get our old data. So I formatted and flashed a new rom all worked like magic and the phone booted.The problem is that the phone is encrypted and the key changed and every time we try to flash our old userdata or userdata and system the phone will say that the entered password was correct but the data is corrupted and will prompt you to reset the phone to factory defaults. This is the main issue with an encrypted phone the userdata partition needs the key to decrypt it. Not sure how the system decides the key, if it is on first boot or during flashing but the key changes when you flash a new ROM. Unfortunately we need the old key.
Step 3 - Unlock the bootloader
The bootloader needs to be unlocked so we can use fastboot. This is done (in my case) via the developer tools. After that, boot to fastboot and send: fastboot oem unlock
Follow instructions on the phone's screen and unlock the bootloader.
Step 4 - Identify the AES key the old rom was using
A good read is How To Decrypt Android Full Disk Encryption.This is a good tutorial but kind of slim on information. You can give it a try, mostly works on Samsung phones and uses John the Ripper to crack the password in case you don't know it.
Another good source of info is: DerbyCon 3 0 1202 What S Common In Oracle And Samsung They Tried To Think Differently About Crypto L
Back to our rom and issues.
Using a UNIX machine run:
strings -t d all.img | grep aes-cbc-essiv:sha256 on the full backup in my case it returned:62685220 aes-cbc-essiv:sha256
1169585764 aes-cbc-essiv:sha256
Using a hex editor and navigating to decimal 62685220 you will see a block of data like this:
            00000000  c5 b1 b5 d0 01 00 00 00  d8 00 00 00 00 00 00 00  |................|

            00000010  20 00 00 00 00 00 00 00  00 10 40 00 00 00 00 00  | .........@.....|

            00000020  00 00 00 00 61 65 73 2d  63 62 63 2d 65 73 73 69  |....aes-cbc-essi|

            00000030  76 3a 73 68 61 32 35 36  00 00 00 00 00 00 00 00  |v:sha256........|

            00000040  00 00 00 00 00 00 00 00  00 00 00 00 00 00 00 00  |................|

            *

            00000060  00 00 00 00 b1 e4 01 10  02 00 00 00 00 00 00 00  |................|

            00000070  00 00 00 00 00 00 00 00  00 00 00 00 00 00 00 00  |................|

            00000080  00 00 00 00 f1 da 84 cf  0f 82 30 b9 a7 bc 16 d4  |..........0.....|

            00000090  bc ed 22 20 43 6d 7c b7  50 aa a3 f2 6f 41 d3 28  |.." Cm|.P...oA.(|

            000000a0  48 cc 63 0d 10 30 ae 35  b6 e3 73 b2 5c 1c 61 dd  |H.c..0.5..s.\.a.|

            000000b0  34 80 07 89 67 34 2e 47  23 68 20 ac df cf 41 3a  |4...g4.G#h ...A:|

            000000c0  10 0c 2d f4 18 9e 50 a0  47 09 ca 5c 90 1d 42 84  |..-...P.G..\..B.|

            000000d0  8a 48 62 7c 00 00 00 00  00 00 00 00 00 00 00 00  |.Hb|............|

            000000e0  00 00 00 00 00 00 00 00  00 00 00 00 00 00 00 00  |................|
This is the section that holds the key, the next address decimal 1169585764 is a list of strings and pose no interest to us.
Looking at the decimal 62685220 converting it to hex the address is: 0x3BC8024, but we can't find it in the scatter file. Well the scatter file in SP Flash Tool only shows the partitions that can be written. Opening the file we can find the partition where the key was found, in my case:
            - partition_index: SYS8

  partition_name: metadata

  file_name: NONE

  is_download: false

  type: NORMAL_ROM

  linear_start_addr: 0x3bc8000

  physical_start_addr: 0x3bc8000

  partition_size: 0x2000000

  region: EMMC_USER

  storage: HW_STORAGE_EMMC

  boundary_check: true

  is_reserved: false

  operation_type: INVISIBLE

  is_upgradable: false

  empty_boot_needed: false

  reserve: 0x00
The problem is that we can't write the metadata via SP Flash tool this is why we unlocked the bootloader, so we can use fastboot to flash the needed partitions.
Step 4 - Recovering the old Partitions
Using a hex editor split the main 32GB file in the partition you can see in the SP Flash Tool after you loaded the scatter file. Tedious work but hey .... we need them. We need the system, cache, userdata, secro and as we found out: metadata.Step 5 - Putting it back together
Use the SP Flash Tool to flash system, cache, userdata to the phone. Using fastboot:
            fastboot flash metadata ./metadata.img

            fastboot flash secro ./secro.img
Boot the phone, enjoy your restored image and your data.
PS: Backup your data. Rule of thumb if it doesn't exist in/on 3 different places/mediums then it doesn't exist.